

August 13, 2014
 This
newsletter is being sent to 34,000+ Excel 'addicts'
around the
world using Aweber,
the
best solution for managing your email campaigns.
This
newsletter is being sent to 34,000+ Excel 'addicts'
around the
world using Aweber,
the
best solution for managing your email campaigns. To change your email address click the link at the end of this email
You can find the online version of this week's newsletter here.

Hi fellow Excel Addict,
") I'll keep this message brief. I've been so busy this week that I've barely had time to put this newsletter together.
I'll keep this message brief. I've been so busy this week that I've barely had time to put this newsletter together.If you have children and think you're busy when they are small, wait till they grow up. My two daughters have grown up and moved out but it seems like I see them more now than when they were teenagers.
I'm very fortunate to have them living close by and I do spend a lot of time with them but now it seems that some of the free time I had when they both were studying at college has disappeared.
I hope you'll enjoy my tips this week.
Please share this newsletter with anyone you think would benefit from these time-saving Excel tips.
Take care and keep on Excelling.
Francis Hayes (The Excel Addict)
Email: fhayes[AT]TheExcelAddict.com
| Need
to Update
Your Subscription Information? Please note that below every
newsletter there
is a link that you can use to access
and update your profile in my database. You can make changes to your
name and email address - and it only takes a couple of seconds. |
This week's tips...
1) Sum Multiple Ranges In One Click
2) Resetting The Used Area Of Your Worksheets
3) My One Square Mile Worksheet
Having trouble displaying this newsletter?
Go here to view my Online Version of This Week's Newsletter
2) Resetting The Used Area Of Your Worksheets
3) My One Square Mile Worksheet
Having trouble displaying this newsletter?
Go here to view my Online Version of This Week's Newsletter
Note that if you ever find an error in my newsletter, chances are that others have too. Whenever a mistake is brought to my attention, I will make the correction (usually the same day) to the online version. So you may want to check back using the link above to read the corrected tip.
Last week's tips were...
1) Quickly Clear Formula
Errors From Blank Rows
2) An Alternative To Freeze Panes For Wide Spreadsheets
3) Using Very Small Fonts In A Cell
Go here to view my Previous Week's Newsletter
2) An Alternative To Freeze Panes For Wide Spreadsheets
3) Using Very Small Fonts In A Cell
Go here to view my Previous Week's Newsletter
You can access even more tips on my website by going to my members' page.


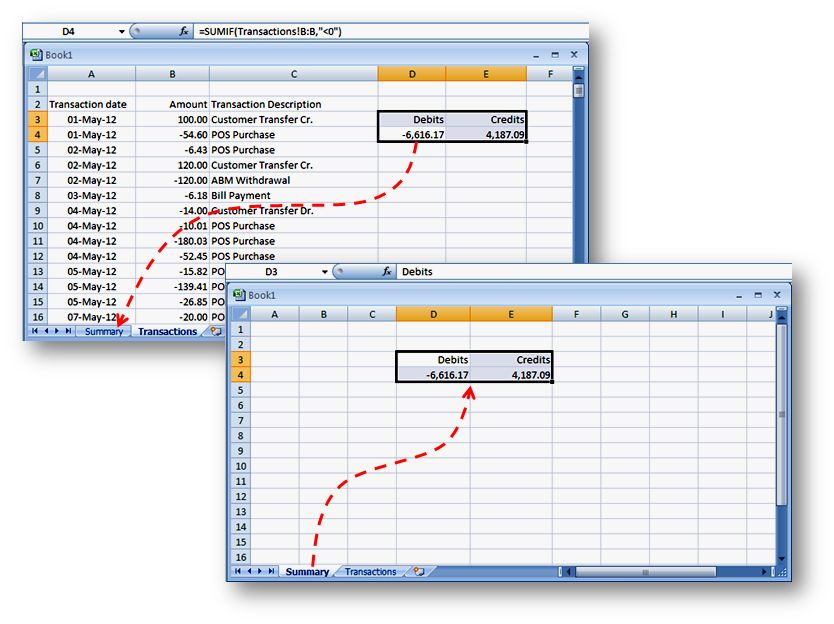
Sum Multiple Ranges In One Click
If you need to add SUM totals to multiple cells in your worksheet, you can do this very quickly using this simple trick. This works even if they are in multiple rows and columns.
Just select all of the cells where you want to put your SUM formulas (below or to the right of your data) and click the AutoSum button on your toolbar (or keyboard shortcut ALT+=).
Almost like magic, SUM formulas are instantly added to all of the selected cells.


Resetting The Used Area Of Your Worksheets
Every once in a while I hear from someone with a problem workbook that has ballooned to multi-megabytes in size for no apparent reason.
Often this is caused either by data, formatting or objects inadvertently being copied to cells that are outside of your actual worksheet data area or cells that have had data deleted but whose formatting remains behind. With Excel now having over a million rows and more than 16,000 columns, there is a lot more area for redundant, memory-hogging data to be hiding.
Before you try my suggestion below, make sure you have a backup copy of your workbook.
1) For each sheet in the problem workbook, go to the cell that is one row below and one column to the right of the last used cell. There should be no formulas or data above and to the right or below and to the left of the cells;

2) Hold down both the CTRL and SHIFT keys and press the down arrow (more than once if necessary) to go to the bottom of the worksheet. With the CTRL and SHIFT keys still held down, press the right arrow (more than once if necessary) to get to the far right edge of the worksheet;

3) Right click the highlighted area and select Delete, Entire Row, OK;
4) Right-click again and Delete, Entire Column, OK;
This will remove any junk and formatting that may have inadvertently gotten added to the cells below and to the right of your data cells.
5) Repeat this for each sheet in your workbook;
6) Save, close and re-open your workbook.
7) To verify that the last used cell has changed, press CTRL+End.
One added benefit to resetting the last used cell in your worksheet is that your scroll bars begin to work correctly again. Now when you scroll half way down the scroll bar, you will be half way down your worksheet data.
Phantom Objects and Stuff:
Another possible reason for a workbook's ballooning file size is objects such as text boxes, shapes, pictures, etc... being accidentally duplicated across many cells. For example, if you copy a row that just happens to be beneath a picture (maybe in a column off screen) and paste this row down a column to hundreds of rows, that picture may also get copied and you end up with hundreds of duplicate pictures.
It is very easy to quickly and dramatically increase your workbooks size by inadvertently duplicating objects hundreds or even thousands of times.
Delete All Objects
Here's how you can quickly delete all objects from your worksheet - even ones you cannot see.
1) Press the F5 key on your keyboard;
2) In the Goto dialog click the Special... button;
3) Select the Objects option and click OK (all objects on the sheet will be selected);
4) Press the Delete key to delete all of the objects.
Delete Select Objects
If you don't want to delete all objects from the sheet, on the Page Layout tab, click on Selection Pane in the Arrange group. A Selection and Visibility pane will be displayed on the right side of your worksheet listing all objects. Hold down the CTRL key (sorry, Shift doesn't work) as you click each object name and then press the Delete. Save, close and re-open your workbook.


My One Square Mile Worksheet
You've probably accidentally, or on purpose, gone to the bottom of a worksheet and discovered that Excel now (since 2007) has 1,048,576 rows. You may have also discovered that the last column in Excel is column XFD.
Have you ever wondered how big an Excel worksheet really is?
There are two worksheet functions you can use to quickly calculate how many cells there are in a worksheet. Once you see how those functions work, you may think of other uses for them.
Excel has a ROW function that returns the row number of a cell reference. For example, =ROW(B3) will return 3 because cell B3 is contained in row 3. There is a similar function for COLUMN. For example, =COLUMN(B3) will return 2 because cell B3 is contained in column 2.
In both these functions, if the cell reference is omitted, Excel assumes that the cell being referenced is the cell containing the function. That means that if you type =ROW() in a cell, the result of the function will be the row number where you typed the ROW function. Same thing for the COLUMN function.
Using these two worksheet functions, you can quickly calculate how many cells there are in a worksheet. Here's how...
Hold down the CTRL key and press the down arrow and you will be taken down to the last row in your worksheet. Next, hold down the CTRL key and press the right arrow key and you will be taken to the last column (XFD) in the worksheet. The cell address is XFD1048576.

Now, if you enter a formula in this cell to multiply the ROW function by the COLUMN function, =ROW()*COLUMN(), you will see that there are more than 17 BILLION cells in an Excel worksheet.
Wow, that's REALLY BIG!
How big?
I figured it to be about one square mile (or almost 3 square kilometers in Canada).

If I printed off all those pages and spread them out on my desk, click the image below to see how much space just one entire Excel worksheet would take up.
Try folding up that report!!

| Subscription
Information Spreadsheet Tips From An Excel Addict is delivered weekly to subscribers to my newsletter. If this newsletter was forwarded to you and you would like to get your own copy, please visit TheExcelAddict.com or send a blank email to theexceladdict(AT)aweber.com If you would like to share this newsletter with others...
|
Copyright Francis J. Hayes All Rights Reserved.
8 Lexington Place, Conception Bay South, Newfoundland, Canada, A1X 6A2 Phone: 709-834-4630