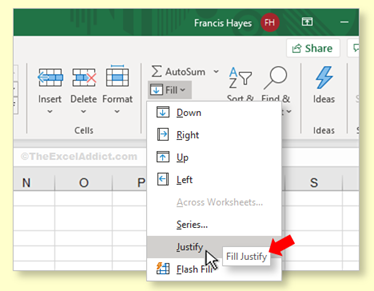
 |
|
| TheExcelAddict.com | |
February 13, 2020 |
|
| Hi fellow Excel Addict, | |
 Welcome
back for another 'Excel in Minutes' tip that I hope will
help boost your productivity in Excel. It's a bit of a
long post today but I promise it will be worth it. Welcome
back for another 'Excel in Minutes' tip that I hope will
help boost your productivity in Excel. It's a bit of a
long post today but I promise it will be worth it.I shared a similar tip a couple of years ago, so you may have already implemented some of this but I have updated it and given a little more detail. If you like this 'Excel in Minutes' tip, please share it on social media and with your colleagues or any other Excel users you know. While you're at it, please recommend to them to sign up for my newsletter. Thanks in advance. LAST CHANCE TODAY TO SAVE 20% ON MYNDA'S EXCEL DASHBOARDS COURSE Today (Feb 13), 8 pm PST is the deadline to save 20% on my friend Mynda Treacy's Excel Dashboards course (although you can still enroll in the course at it's regular cost until Feb 20th). If you're not sure and want to find out what this is all about, why not check out Mynda's FREE TRAINING webinars. Believe me you will be amazed at how many tricks and tips you'll learn just from watching her 1-hour webinar. THEN you will understand why Excel Dashboard skills are so valuable and in demand. I promise that you won't be disappointed. More than 1,200 Excel Addict members have already taken Mynda's course. Have a great day and keep on Excelling, Francis Hayes (The Excel Addict) Email: fhayes[AT]TheExcelAddict.com |
|
|
|
|
|
|
|
| Missed my last newsletter? | |
Click Here to View it Online |
|
| |
|
Having a positive attitude can help us in difficult times. I hope today's quote will help you foster a positive attitude today. Quote of the Day "What lies behind you and what lies in front of you, pales in comparison to what lies inside you." -- Ralph Waldo Emerson -- |
|
|
If you have a favourite quote, send it to me
and I may post it in my newsletter.
|
|
THIS WEEK'S 'EXCEL IN MINUTES' TIP |
|
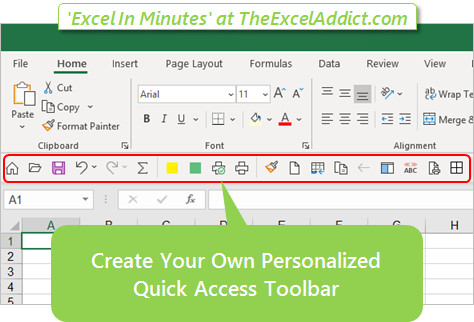
Create Your Own Personalized Quick Access Toolbar |
|
 EVERYONE can do this...it's not just for Excel geeks. A customized QAT allows you to quickly access those commands you use most often, with just one click. No more multiple clicks, searching around the Ribbon and trying to remember where those commands are located. Customizing the Quick Access Toolbar is really easy to do. Adding commands to your QATThere are two ways you can add commands to your QAT.Option 1: Right-click, Add to Quick Access Toolbar Not all commands are available using this method but it's quick and easy whenever you decide that a specific command on the Ribbon would work better for you on the QAT. 1) Locate a command on the Ribbon that you would like to have on your QAT; 2) Right-click the command and select Add to Quick Access Toolbar. The command is added to the end of the QAT commands, so if you would like to reposition it, you will need to use Option 2. Option 2: Customize Quick Access Toolbar You would use this option when...
1) Right-click the small dropdown on the end of the Quick Access Toolbar and choose More Commands... 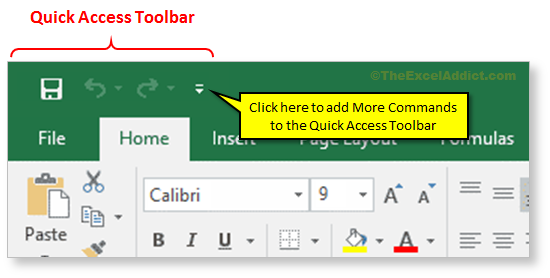 (or right-click on the Quick Access Toolbar and choose Customize Quick Access Toolbar.) The Excel Options dialog opens with the Quick Access Toolbar tab selected on the left; 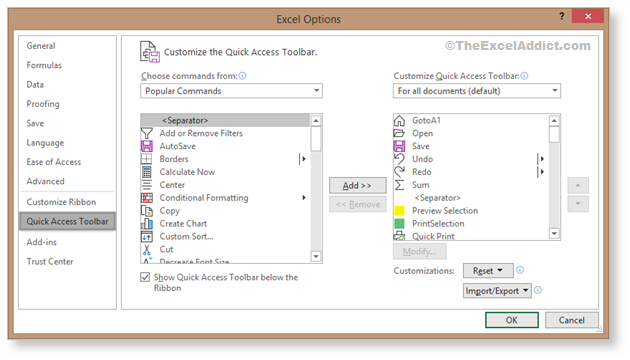 2) Click the 'Choose commands from' dropdown arrow. If you are adding multiple commands from a particular tab (e.g. Insert Tab, Data Tab, etc...), select that group from the list, otherwise, select All Commands to get an alphabetical listing of ALL available commands. 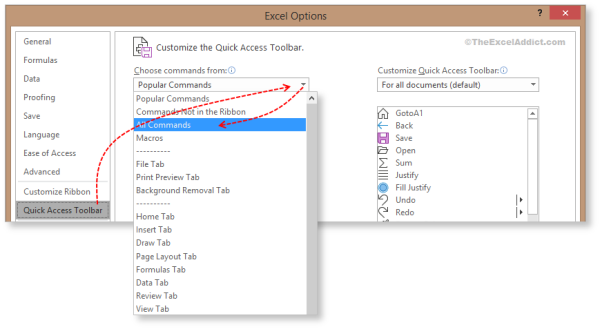
3) Next, scroll down the All Commands list in the Excel Options dialog and select the command you want to add. Then click the Add>> button. Note that if you want to position the command somewhere other than the end of the QAT, use the up and down buttons on the right side of the dialog. Alternatively, before you add a command, select the existing QAT command (on the right of the dialog) that is above the position where you want to add the new command. 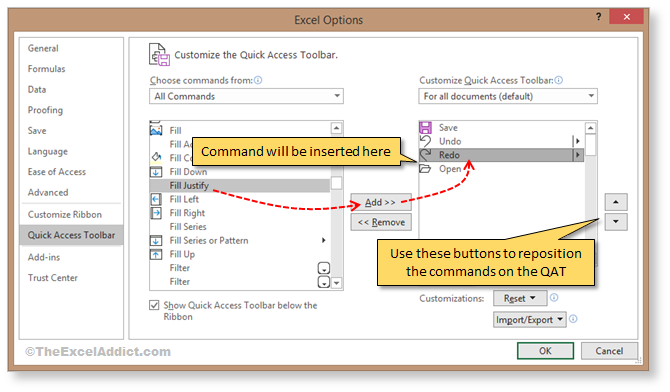 Repeat this step for each command you want to add. 4) Click OK to close the Excel Options dialog. Quick Access Toolbar Above or Below the Ribbon?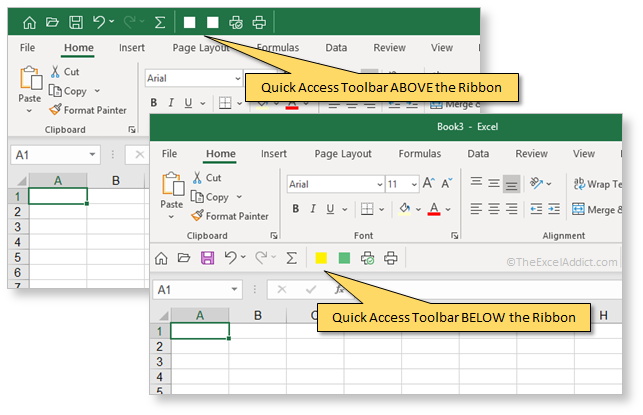 The Quick Access Toolbar can be positioned above or below the Ribbon. Personally, I have my QAT below the Ribbon because I find that it requires less mouse movement and eye movement to get from the worksheet to the QAT commands. Plus, as you'll see, the icons blow the Ribbon are in full color whereas, when placed above the Ribbon, they are boring and difficult to see. Move Quick Access Toolbar Below the RibbonTo move your QAT below the Ribbon, right-click the small dropdown on the end of the Quick Access Toolbar and choose Show Below the Ribbon (or right click the Ribbon and select 'Show Quick Access Toolbar Below the Ribbon').Removing Commands From Your QATRemoving commands from your QAT is really easy. You simply right-click the command on your QAT and select Remove from Quick Access Toolbar.Adding a Macro to Your QATIf you have a macro that you would like to run from a button on your QAT, here's how you can do that.1) Right-click the small dropdown on the end of the Quick Access Toolbar and choose More Commands... (or right click the Ribbon and select Customize Quick Access Toolbar); 2) In the 'Choose commands from' field, click the dropdown arrow and select Macros. You should see the macros for all open workbooks listed; 3) Scroll down and select your macro from the list and click the Add>> button; 4) Click OK. 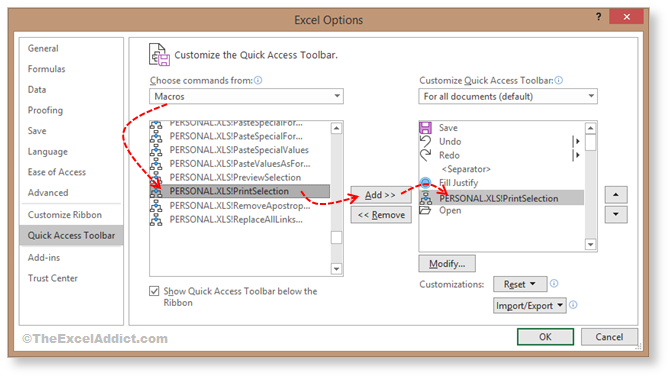 Changing the Icon and Display Name for a QAT MacroWhen you add a macro to your QAT, a default icon is used. If you would like to use a different icon, click the Modify... button at the bottom of the dialog. A Modify Button dialog showing various icons appears. Choose any icon that you would like to use for your macro. At the same time you can change the name of the 'tool tip' that displays when you hover you mouse pointer over the icon on the QAT. To see what macro a QAT command is linked to, open the Excel Options (Quick Access Toolbar) and hover your mouse pointer over the command on the right side of the dialog. When you're finished, click OK to close the Excel Options dialog. Organize Your QAT With SeparatorsWhen you have related commands (e.g. File commands, Data commands, etc...) on your QAT, it's good practice to group them together. The first item in the commands list in the Excel Options dialog is <Separator> which you can use to insert a vertical bar between two commands on the QAT.. To add a separator, select <Separator> and click Add>>.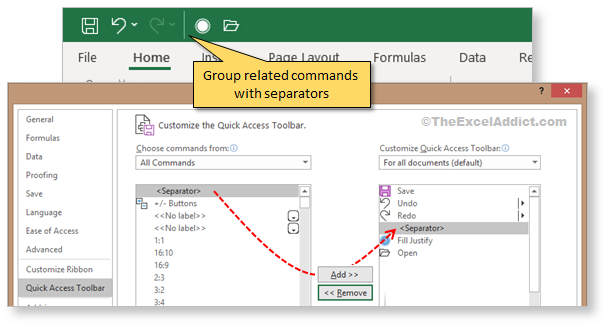 Add QAT Commands Only for Specific WorkbooksNote that you can also choose to add commands to the QAT that are available only when a specific workbook is open. Make sure the workbooks is open and in the Excel options dialog on the Quick Access Toolbar tab you'll see a dropdown on the top right showing For alll workbooks (default'. Here you can choose to have the commands shown on the QAT only for the current workbook.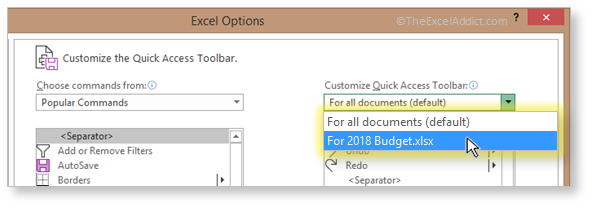 ConclusionThe Quick Access Toolbar is a very important part of my strategy for increasing my productivity in Excel. Having one-click and always-in-view access to my most frequently used commands, including macros, allows me to get my tasks done much faster than if I had to poke around the Ribbon to access the same commands.All those seconds saved really add up over time. Once you create YOUR OWN PERSONAL Quick Access Toolbar with YOUR most frequently used commands just one click away, you will wonder how you ever managed without it. Why don't you give it a try and let me know what you think. |
|
|
|
|
|
|
|
 |
|
|
|
|
| Disclosure: Some of the resources I recommend on my website and in my newsletter pay me a small referral commission if you purchase from them through links on my website or using my referral code. This helps offset the costs of my website. I've worked long and hard to build up my reputation online over the past 10 years as someone who provides exceptional value to my readers. So I'm not willing to risk that. As you know, I donít just recommend anything. It has to be of outstanding quality and value. If you are EVER not completely satisfied with anything I recommend, please let me know and you will get your money...GUARANTEED. You can't lose. | |
